Installing the agent
Paths and names below are taken from the agent's source as of a recent build and will be reconfirmed against each release.
The agent runs as a Windows service on each Hyper-V host you want Ballast to manage. It never invents intent — it only enforces the desired state most recently handed to it by the centre, which is what lets it keep a host steady if the centre goes offline.
There are two ways to get an agent onto a host: push it from the console (no RDP or console session on the host needed, if WinRM is already reachable), or fetch and install it by hand on the host itself. Push is usually less work; the manual path below is what push does under the hood, and is the one to use when WinRM isn't reachable from the centre yet.
Push from the console
From the fabric's + menu, New host… opens a dialog that can deploy the agent over WinRM and author the host's initial desired state (rename, domain join, a day-0 static IP, cluster membership) in the same step:
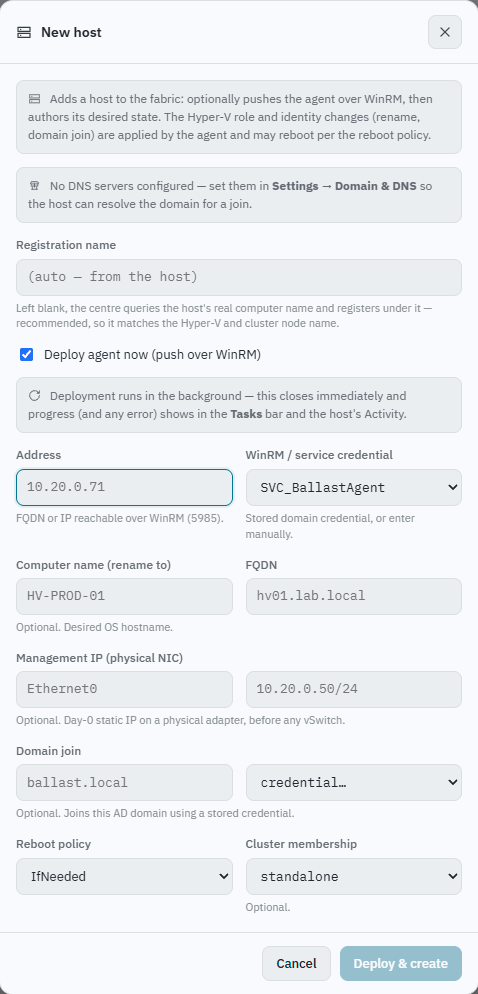
- Address and a WinRM / service credential (a stored credential, or typed manually) are the only two fields required to deploy the agent itself — everything else declares desired state for it to enforce once registered, and can be left blank and set later.
- Leaving Registration name blank is recommended: the centre queries the host's real computer name and registers under that, so it matches the Hyper-V and cluster node name rather than something typed by hand.
- Deployment runs in the background — the dialog closes immediately, and progress (or any error) shows in the Tasks bar and the host's Activity once it appears in inventory.
- Running New host… again against a host already pointed at a different centre repoints it — the new centre takes over that host. See Troubleshooting before doing this on a host you didn't mean to move.
Manual install (any host)
1. Fetch the agent binary
If the centre was started with -agent-binary, it serves the installer
directly, so a host with network access to the centre needs nothing
pre-staged:
Invoke-WebRequest https://centre.example.internal:8080/agent/ballast-agent.exe `
  -OutFile ballast-agent.exe
2. Install and point at the centre
.\ballast-agent.exe -install -centre centre.example.internal:9443
This step:
- Installs the
BallastAgentWindows service (processballast-agent). - Places the binary at
C:\ballast\ballast-agent.exe. - Requests and stores an agent certificate —
ca.pem,agent-cert.pem,agent-key.pem— underC:\ballast, and adds the CA to the host's trusted root store. - Creates
C:\ProgramData\Ballastfor the local state store (agent.db, holding the last-honoured desired state) and the agent log (agent.log).
The agent pulls its desired state and reports status on an interval controlled
by -heartbeat, default 15 seconds.
Running -install -centre again on a host already pointed at a different
centre repoints it — the new centre takes over that host. See
Troubleshooting before doing this on a host
you did not mean to move.
3. Confirm registration
Once the service starts, the host should appear in the centre's console inventory within one heartbeat interval. If it does not, see Troubleshooting.
Uninstalling
.\ballast-agent.exe -uninstall
This removes the service and binary. It does not delete
C:\ProgramData\Ballast — remove that directory separately if you want the
local state store and log cleared as well.