Installing the centre
There are two ways to get a centre running: the guided Rocky Linux appliance
install (recommended), or running the ballast-centre binary directly on any
supported platform.
Recommended: Ballast Manager on Rocky Linux
A Rocky Linux appliance carries a second, unprivileged-by-design program
alongside the centre: Ballast Manager, a small web UI (default
0.0.0.0:9444) that does the entire install for you.
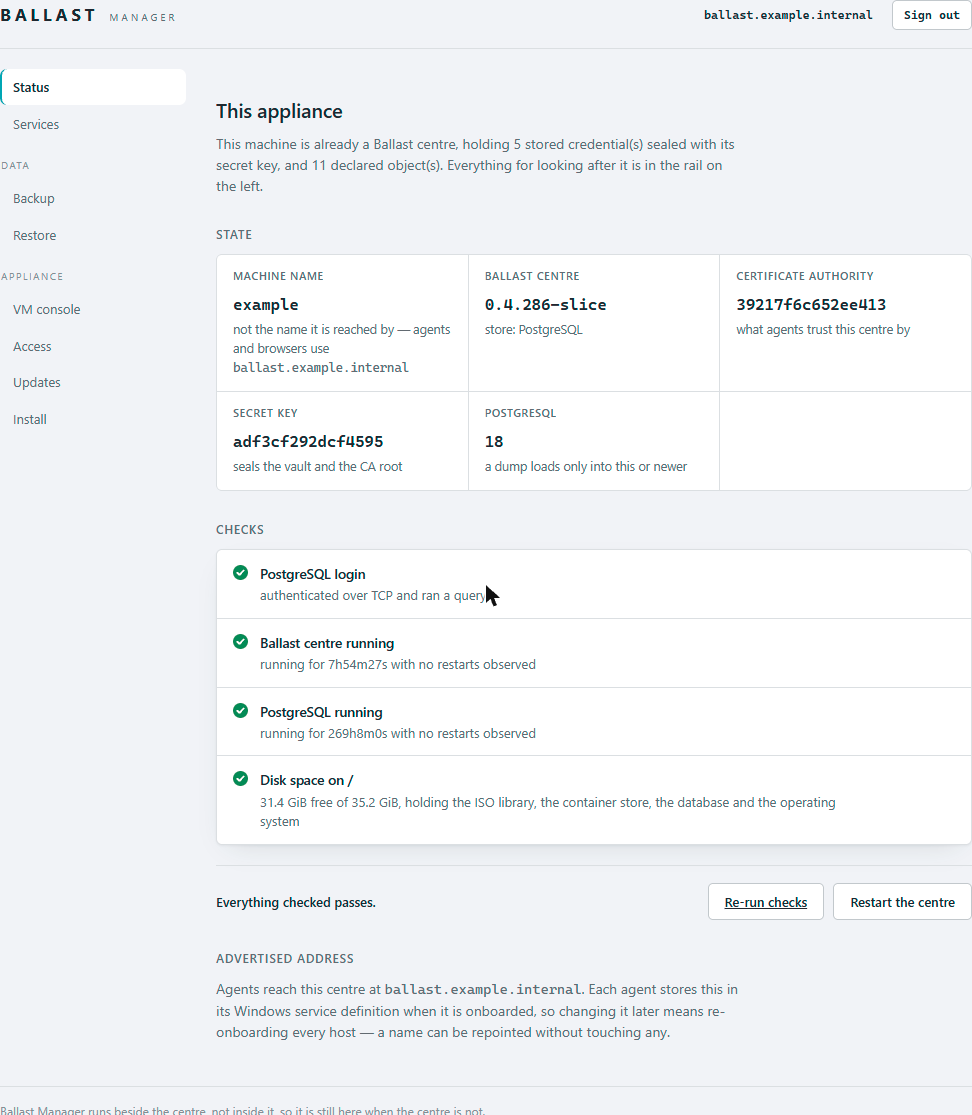
This is what it looks like once installed and running — the Status page is where it lives day to day, with Install (used below), Backup, Restore and Updates alongside it in the same rail.
Getting Manager onto a bare box
There is currently no packaged installer or pre-built appliance image for this step — it's on the roadmap, not shipped yet. What follows is the actual manual process today, and it will stay accurate even once a packaged path exists alongside it.
Manager has to already be running before it can do anything, which means one manual bootstrap on a fresh Rocky 9 box before you ever open a browser:
- Build it for the appliance — same target as the centre, Linux/amd64,
CGO off:
$env:GOOS = "linux"; $env:GOARCH = "amd64"; $env:CGO_ENABLED = "0"go build -o ballast-manager ./manager/cmd/ballast-manager
- Copy it to the box as
/usr/local/bin/ballast-manager(the exact path its own systemd unit expects) and make it executable. - Relabel it for SELinux. A file copied into
/usr/local/binkeeps the SELinux context of wherever it came from, not a context that's allowed to execute — the failure looks like a plain permission error and points nowhere near SELinux.restorecon -F /usr/local/bin/ballast-manager(ifgetenforcereportsEnforcing). - Open its port, if firewalld is active — nothing does this for you
automatically the way the centre's own ports get opened during install:
firewall-cmd --permanent --add-port=9444/tcp && firewall-cmd --reload
- Run it once, as root, so it starts serving and — as a side effect of
starting — writes and enables its own systemd unit so it survives a
reboot from then on (nothing installs that unit ahead of time; the
running program installs it for itself):
Leave that running (or background it) and browse toballast-manager
https://<box>:9444. The browser will warn about an untrusted certificate on first visit — Manager issues itself a self-signed one covering the box's hostname and addresses; the certificate's fingerprint is also printed to the console output, if you want to verify it before trusting the browser prompt. From here on, the unit that first run installed brings Manager back on every subsequent boot without any of the steps above.
Browse to it and the first visit lets you set an administrator password for the manager itself — separate from the centre's own admin account, set later at its first sign-in.
From the install page, give it:
- The advertise address agents will be told to reach the centre on. Agents store this in their Windows service definition at onboarding, so changing it later means re-onboarding every host.
- An uploaded linux/amd64 build of
ballast-centre. The manager cannot build one itself — the appliance carries no Go toolchain, and it's meant to work on an isolated management network with no route out — so this is a browser upload, the same way a database restore is. - Optionally, a Windows agent
.exe, to enable push onboarding (installing the agent onto a host straight from the console). - Optionally, whether to install the VM console (guacd), which needs a route to a container registry to pull its image.
From there the manager runs the whole install as one ordered, resumable sequence, each step independently verified rather than trusted on exit code:
- Create the
ballastsystem service account (no login shell, no home directory) - Create
/etc/ballast(root-owned, groupballast) and the service account's state directory - Install PostgreSQL via the
postgresql:18module stream — deliberately not Rocky's default package, which is PostgreSQL 13 and can never load a dump taken from the 17/18 servers this product runs on, sincepg_restoreonly loads forward - Initialise the database cluster
- Start PostgreSQL
- Set
password_encryptiontoscram-sha-256before the role's password is created — set afterwards, the stored hash would be unusable and the failure would read as a wrong password - Set loopback authentication in
pg_hba.conf(local peer and replication lines are left untouched) - Create the centre's database role and database, generating a password
- Write
/etc/ballast/centre.env(root-owned,0640, groupballast), generatingBALLAST_SECRET_KEYif this machine has none - Place the uploaded centre binary and relabel it for SELinux
- Install the
ballast-centresystemd unit - Label the agent port for SELinux
- Open 443/9443 in firewalld (PostgreSQL is never opened — it listens on loopback only)
- Place the agent binary, if one was uploaded
- Start the centre and confirm it answers its own
/healthz - Install guacd, if the console was requested
A failed or interrupted install is safe to just run again: completed steps are skipped, but every skipped step is still re-verified, so "already done" never quietly means "unchecked."
Manual install (any platform)
Flags and defaults below are taken from the centre binary's source as of a
recent build. They will drift as the product moves — treat centre --help
on the binary you actually run as the source of truth, and this page as a
convenience copy of it.
There is no configuration file. Everything is a command-line flag — Ballast
Manager's install above simply generates these same flags into a systemd
EnvironmentFile rather than you typing them.
1. Provide a database
The centre stores desired state, inventory and job history in PostgreSQL. Create an empty database and a role the centre can connect as, then pass the connection string as a DSN.
2. Run the centre binary
./ballast-centre \
  -db "postgres://ballast:password@localhost:5432/ballast?sslmode=disable" \
  -listen 0.0.0.0:9443 \
  -rest-listen 0.0.0.0:8080 \
  -advertise centre.example.internal
| Flag | Default | Purpose |
|---|---|---|
-db | (none) | PostgreSQL DSN. Omitted entirely, the centre falls back to an in-memory store — nothing survives a restart. Development only. |
-listen | 127.0.0.1:9443 | Address the gRPC service (agent channel) binds to. |
-rest-listen | 127.0.0.1:8080 | Address the REST API and console bind to. Empty disables the console. |
-advertise | (none) | Address agents should dial back on. Required whenever the bind address is not what agents can reach. |
-auth | true | Authentication for the console/REST API. |
-tls | true | Mutual TLS on the agent gRPC channel. |
-rest-tls | false | HTTPS on the console/REST listener. Browsers trust it once they import /ca.crt. |
-agent-binary | (off) | Serves the agent installer at /agent/ballast-agent.exe so hosts can fetch it directly from the centre. |
-iso-dir | (none) | Directory backing the ISO library. |
-guacd | (none) | Address of a guacd instance, enabling the interactive VM console in the browser. Pair with -console-secret naming the stored credential to use. |
First sign-in
Browse to the REST/console listener address (port 443 on the Rocky Linux appliance). The first visit lets you set the initial administrator password — there is no default credential and no separate token step.
Certificates
With -tls at its default of true, the agent channel uses mutual TLS. On
first run without existing certificates, the centre generates a CA and issues
itself a server certificate. Agents are issued their own certificate during
agent installation.
The root CA certificate is valid for 10 years; issued leaf certificates (the centre's own server certificate and each agent's client certificate) are valid for 2 years by default. Renewal is a convenience rather than a hard deadline — an agent keeps enforcing its last-known desired state even past certificate expiry, so a lapsed cert does not stop the fleet from running.
The CA's private key is sealed by BALLAST_SECRET_KEY, an environment
variable that is not stored in the database. This is the single most
important fact for backups: a PostgreSQL dump on its own restores the whole
fleet's configuration with no usable credentials and a CA that can no longer
sign anything. A backup of the centre must also include a verified copy of
BALLAST_SECRET_KEY — the centre's key escrow export (a passphrase-encrypted
copy of the key) is the supported way to do this. Verify that an escrow
actually decrypts before you need it, not at the point of a real recovery.
Running as a service
On the Rocky Linux appliance this is handled for you: Ballast Manager
installs ballast-centre.service under systemd, reading its flags from
/etc/ballast/centre.env as an EnvironmentFile. For any other platform,
running the binary under your own systemd unit (Linux) or as a Windows
service is on you for now — packaged guidance for platforms outside the
Rocky Linux appliance will be added here once that path exists.