VMware migration guide
The screenshot and its detail below are from a real registered source; the step-by-step wording around them is still being verified end to end.
Ballast can import a VM's disks directly from VMware-accessible storage and register it as a Hyper-V VM, without a separate conversion tool run by hand.
Before you start
- Confirm the guest OS is one Hyper-V supports as a generation 1 or 2 VM.
- Linux guests: a VM migrated from VMware commonly boots to what looks
like a missing disk. This is usually the initramfs/dracut image built for
the old hypervisor's storage drivers, not an actual data loss — install
hyperv-daemons-equivalent drivers into the image (or rebuild the initramfs) before or immediately after migration. See Troubleshooting. - Ballast has no in-guest channel into a Linux guest the way it does for a Windows guest with the Hyper-V integration services — plan any in-guest driver work as a manual step.
1. Register a source and scan it
Register a VMware source (a vCenter or a standalone ESXi host); Ballast reads what it holds and what each VM arrives as before anything is copied:
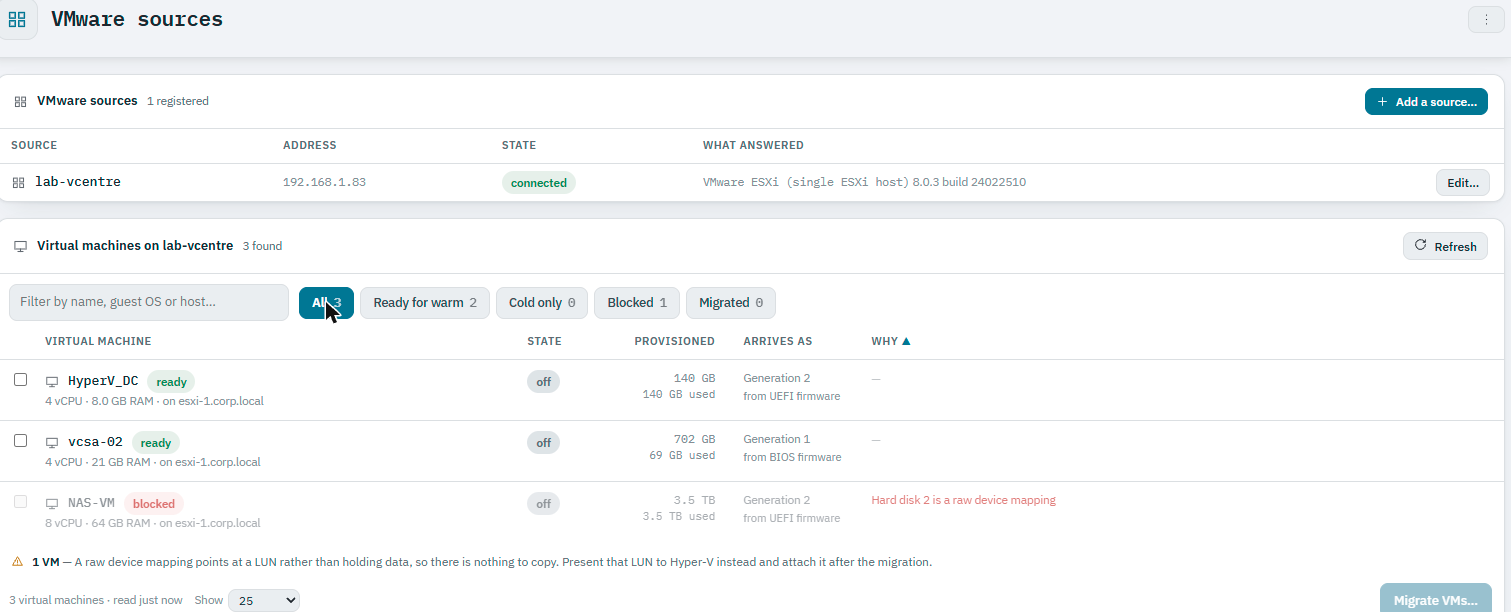
Each discovered VM is filterable by whether it is ready, ready for a warm migration, cold-only, blocked, or already migrated — and blocked VMs say exactly why. A real example: a VM whose disk is a raw device mapping is blocked with "Hard disk 2 is a raw device mapping", and the console explains what that means and what to do about it rather than leaving the operator to work it out:
A raw device mapping points at a LUN rather than holding data, so there is nothing to copy. Present that LUN to Hyper-V instead and attach it after the migration.
2. Import
Choose a scanned VM and import it. This registers a new Hyper-V VM from the existing virtual disks. The source's VMDK is never attached in place — Ballast streams it (via a VMware snapshot export lease) directly into a newly created VHDX on the destination host or CSV, converting as it goes. Because the stream only carries grains where the source disk actually has data, a thin disk crosses the wire at roughly what it occupies rather than what it claims.
3. Verify and reconfigure networking
An imported VM's network adapters do not carry over VMware's vSwitch/port group model — Hyper-V has no dvSwitch or dvport equivalent. Reattach the guest's vNICs to the correct vSwitch and, if used, VLAN as a normal desired-state edit after import.
4. Power on and confirm
Start the VM and confirm the guest boots and its network is reachable. For a warm migration of a VM that must stay running until cutover, note that a running guest holds a lock on its own base disk — see Troubleshooting for what that means for timing.
What is not supported yet
- Bulk/batch migration of many VMs in one action.
- Live (zero-downtime) migration directly from a running VMware host.
Both are tracked on the roadmap; this page will be updated when either ships.