VMware migration guide
:::note Placeholder page The screenshot and its detail below are from a real registered source; the step-by-step wording around them is still being verified end to end. :::
Ballast can import a VM's disks directly from VMware-accessible storage and register it as a Hyper-V VM, without a separate conversion tool run by hand.
Before you start
- Confirm the guest OS is one Hyper-V supports as a generation 1 or 2 VM.
- Linux guests: a VM migrated from VMware commonly boots to what looks
like a missing disk. This is usually the initramfs/dracut image built for
the old hypervisor's storage drivers, not an actual data loss — install
hyperv-daemons-equivalent drivers into the image (or rebuild the initramfs) before or immediately after migration. See Troubleshooting. - Ballast has no in-guest channel into a Linux guest the way it does for a Windows guest with the Hyper-V integration services — plan any in-guest driver work as a manual step.
1. Register a source and scan it
Register a VMware source (a vCentre or a standalone ESXi host); Ballast reads what it holds and what each VM arrives as before anything is copied:
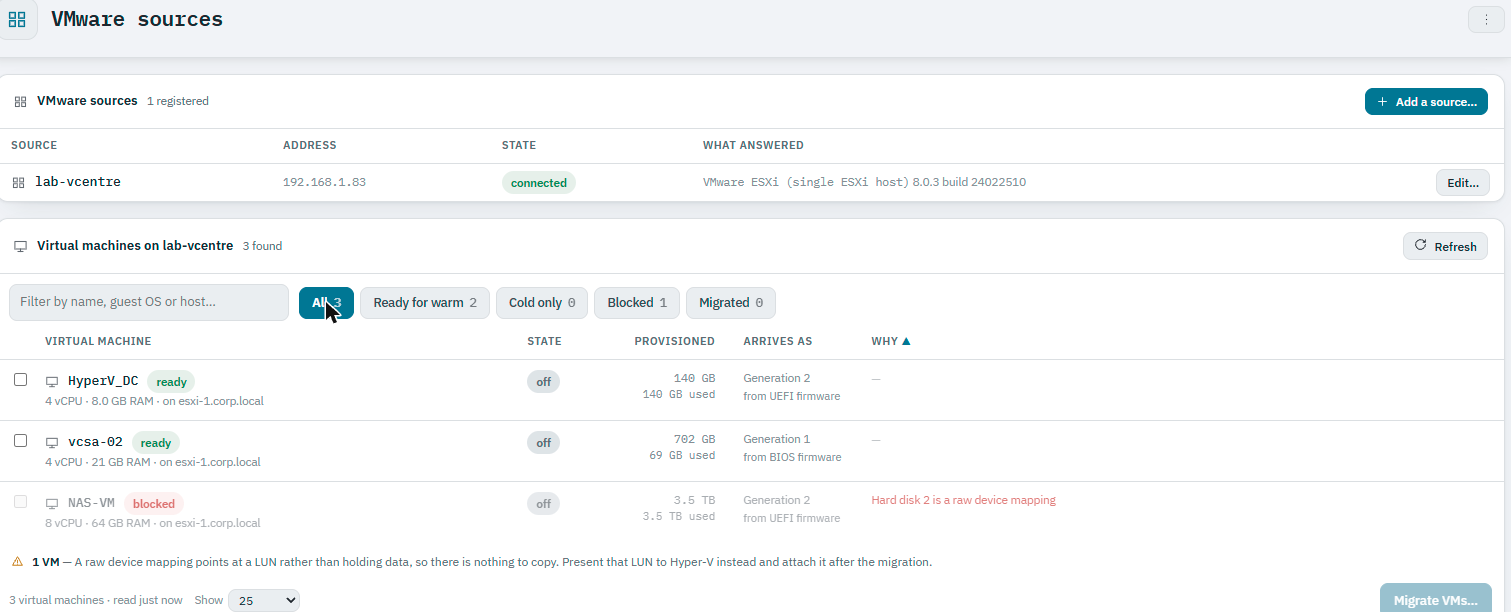
Each discovered VM is filterable by whether it is ready, ready for a warm migration, cold-only, blocked, or already migrated — and blocked VMs say exactly why. A real example: a VM whose disk is a raw device mapping is blocked with "Hard disk 2 is a raw device mapping", and the console explains what that means and what to do about it rather than leaving the operator to work it out:
A raw device mapping points at a LUN rather than holding data, so there is nothing to copy. Present that LUN to Hyper-V instead and attach it after the migration.
2. Import
Choose a scanned VM and import it. This registers a new Hyper-V VM from the
existing virtual disks; the exact disk format handling (VMDK conversion vs.
in-place attach) is TBC.
3. Verify and reconfigure networking
An imported VM's network adapters do not carry over VMware's vSwitch/port group model — Hyper-V has no dvSwitch or dvport equivalent. Reattach the guest's vNICs to the correct vSwitch and, if used, VLAN as a normal desired-state edit after import.
4. Power on and confirm
Start the VM and confirm the guest boots and its network is reachable. For a warm migration of a VM that must stay running until cutover, note that a running guest holds a lock on its own base disk — see Troubleshooting for what that means for timing.
What is not supported yet
- Bulk/batch migration of many VMs in one action.
- Live (zero-downtime) migration directly from a running VMware host.
Both are tracked on the roadmap; this page will be updated when either ships.